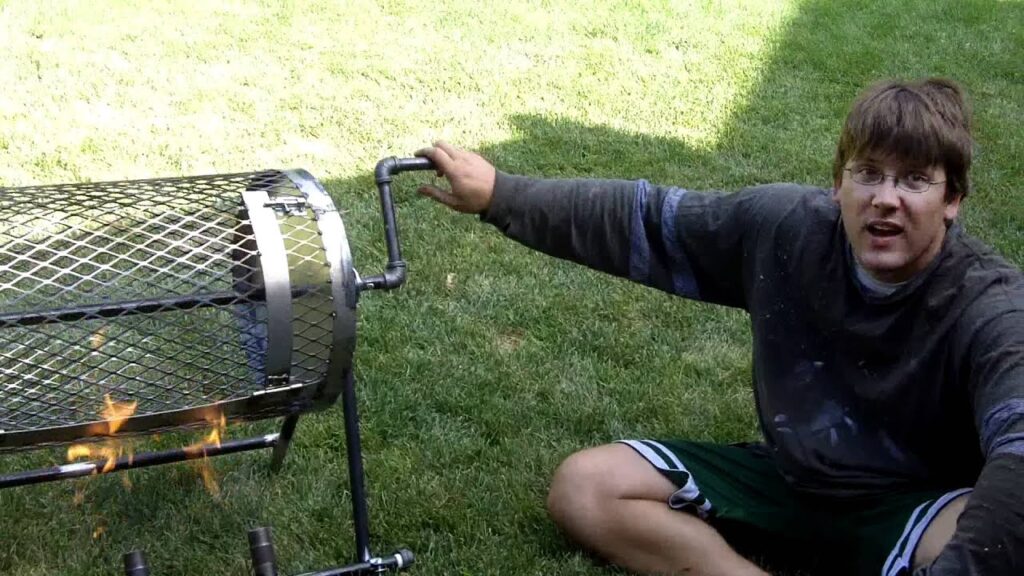
How to Make a Homemade Chile Roaster
There’s something magical about the smoky, charred flavor of roasted chiles. Whether you love the gentle heat of poblano chiles or the fiery kick of jalapeños, a homemade chile roaster is the perfect addition to your culinary arsenal.

In this DIY guide, I’ll show you how to create your very own homemade chile roaster and elevate your roasting game to a new level.
Materials You’ll Need
Before you dive into creating your homemade chile roaster, gather the essential materials and tools. You can find most of these items at your local hardware store or online:
- Metal Drum: Look for a metal drum or barrel, ideally made from stainless steel, as it can withstand high temperatures. The size of the drum will depend on your needs and the space you have available.
- Metal Stand: You’ll need a sturdy metal stand to support the drum and elevate it above the heat source. This can be a metal frame or a few sturdy metal legs.
- Propane Burner: To provide the necessary heat for roasting, acquire a propane burner with an adjustable flame. It should be compatible with a standard propane tank.
- Thermometer: Invest in a reliable thermometer to monitor the roasting temperature and ensure consistent results.
- Hinged Lid: You’ll need a hinged lid for the drum to trap the heat and smoke during the roasting process. It should have a handle for easy access.
- Drill and Metal Screws: To secure components together, you’ll need a drill and metal screws. Ensure they are appropriate for the thickness of the metal.
- Metal Mesh or Grill Grates: Acquire metal mesh or grill grates to place inside the drum, allowing the chiles to roast evenly.
Steps to Build Your Homemade Chile Roaster
Once you have all the materials at your disposal, follow these steps to construct your homemade chile roaster:
Step 1: Prepare the Drum
- If your metal drum previously contained any substances, clean it thoroughly to remove any residues. Ensure it’s completely dry before moving forward.
Step 2: Create the Stand
- Weld or attach metal legs or a metal frame to the bottom of the drum. This stand should elevate the drum above the propane burner, allowing space for the heat source and proper airflow.
Step 3: Attach the Propane Burner
- Secure the propane burner to the underside of the stand. Make sure it’s centered and securely fastened. Connect it to a propane tank, following the manufacturer’s instructions.
Step 4: Install the Thermometer
- Drill a hole in the drum near the top and attach the thermometer. This will allow you to monitor the internal temperature during the roasting process.
Step 5: Add the Hinged Lid
- Attach the hinged lid to the drum’s top, ensuring it seals tightly to keep the heat and smoke inside during roasting. The handle should provide easy access to the chile roasting chamber.
Step 6: Insert Metal Mesh or Grill Grates
- Place the metal mesh or grill grates inside the drum to create a platform for your chiles. Ensure they fit snugly but allow for easy removal for cleaning and maintenance.
Step 7: Test Your Homemade Chile Roaster
- Before your first roasting session, perform a test run without chiles to ensure that the roaster heats properly and that the thermometer is accurate.
Using Your Homemade Chile Roaster
Now that your homemade chile roaster is ready, you can use it to roast chiles to perfection. Here’s a quick overview of the process:
- Prepare Your Chiles: Wash, dry, and remove stems and seeds from your chiles.
- Preheat the Roaster: Fire up your propane burner and preheat the roaster, ensuring it reaches the desired roasting temperature.
- Load the Chiles: Spread your prepared chiles evenly inside the roasting chamber.
- Roast the Chiles: Keep a close eye on your chiles and roast them until they reach your desired level of char and smokiness.
- Cool and Peel: Allow the roasted chiles to cool slightly, making them easier to peel, which you can do with your fingers or a spoon.
- Use Your Roasted Chiles: Incorporate the roasted chiles into your favorite dishes to add a delightful smoky flavor.
To Use Your Homemade Chile Roaster:
- Preheat the roaster by turning on the propane burner.
- Place the chiles in the roaster.
- Rotate the chiles periodically to ensure that they cook evenly.
- Roast the chiles until the skins are charred and the flesh is soft.
- Remove the chiles from the roaster and allow them to cool.
- Once the chiles are cool, peel and seed them, if desired.
- Enjoy your delicious roasted chiles!
Tips:
- Be sure to use a metal drum that is large enough to hold the amount of chiles you want to roast.
- Use a propane burner that is powerful enough to heat the drum evenly.
- Be careful not to overcook the chiles. Overcooked chiles will be mushy and have a bitter taste.
- Clean the roaster thoroughly after each use. This will help to prevent the growth of bacteria.
Creating your homemade chile roaster is a satisfying and cost-effective way to unlock the delicious smokiness of roasted chiles. With your new DIY roaster, you can roast chiles to perfection and infuse your favorite recipes with that irresistible smoky, spicy kick. Enjoy your culinary adventures with your very own homemade chile roaster!
